Pages

September 30, 2010

Cream of Potato Bacon Soup

My Dad gave me a grocery bag full of potatoes straight from the garden so I had to rush home and whip up something yummy.


I don't know about you, but Cream of Potato Bacon Soup is one of my favourite things in the whole world. So, so, so good. Total comfort food that is just perfect for a chilly Fall night.


The secret ingredient is nutmeg. If you've never used nutmeg in a potato dish, you're probably thinking I'm nuts, but just wait until you try this!!!


Any recipe that starts like this can not be bad! Oh, did I mention that this recipe is not for those who are watching their weight?!

Note: this is my own recipe so I'd really appreciate credit and a link to my blog if you choose to repost. Thank you :)

Cream of Potato Bacon Soup
 
1 pound bacon, cut into chunks
1 large onion, diced
3 stalks celery, sliced
2 cloves garlic, minced
10-12 potatoes, peeled and cut into 1" cubes
About 3 cups chicken stock (enough to cover potatoes)
1 cup heavy cream
1/4 tsp nutmeg
1/4 tsp black pepper
1/4 tsp salt
 
1. Fry the bacon on medium-high until crispy; set aside. Reserve 1-2 Tbsp of the bacon grease.
2. In a soup pot, saute onion and celery in the reserved bacon grease. Once almost fully cooked, add garlic and cook for another minute.
3. Add potatoes and saute until softened (I microwaved mine for 10 minutes first so it would be super quick, but you can boil them or leave them raw). Add chicken stock and bring to a boil. Cover and simmer until potatoes are cooked through.
4. Puree soup until it reaches desired thickness (I use an immersion blender).
5. Stir in heavy cream, bacon, nutmeg, salt, and pepper. Simmer for another minute or two and enjoy!
 
My tip for using whole nutmeg is to keep grating it in to the pot until I start to smell it.
 
Oh yea, if you calculate the nutritional information for this, you're not allowed to tell me :)

September 23, 2010

Homemade Vanilla!

I'm fairly new to the blogging world - writing and reading - boy have my eyes have been opened!

I've always been pretty creative in the kitchen, but there are some things that I just never thought of making homemade like hamburger buns, Pop-Tarts, and vanilla! It's ridiculously easy. You just pour, shake, and wait. Seriously.


Take 1 cup of a pretty good vodka (I just used Absolut because that's what I had) and pour it into a jar.
Split 2 vanilla beans and throw them in the jar. Close the lid and shake it up!
Shake it once a day for a week. Then, once a week for 2-3 months. I put my jar on its side so the beans are totally covered by the vodka.

Then bake up some yummies with your homemade, pure vanilla extract! Or, if you're really generous, you can pour it into some pretty bottles and give it away as gifts. Now is the perfect time to make your vanilla if you want to give it away at Christmas ;)

September 22, 2010

Twitter

Not sure if anyone is reading this yet, but I have started a Twitter account. Please check it out! I'll do my best to keep both my blog and Twitter updated :)

Homemade Hamburger Buns

Yep. Hamburger buns. From scratch. And they're SO good. They are so easy that I was worried I had messed something up. I will never, ever buy hamburger buns again. I used this recipe, but if you don't have a bread machine you can use this recipe. Also, I halved the recipe and it worked just fine!


First, proof the yeast in the pan of the bread machine. I find it works best if you dissolve the sugar in the water first and then add the yeast, but you can throw all 3 in at the same time. After 10 minutes it should look like this:


Next, add buttermilk, bread flour, salt, and butter. I was out of white bread flour so I used 1 1/2 cups whole-wheat bread flour and 1 cup of regular old All Purpose white flour.


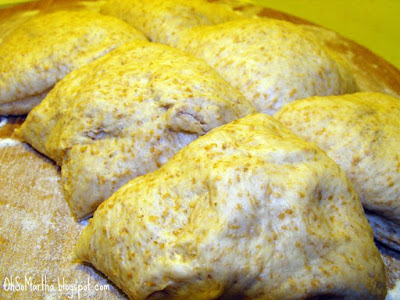
Set to regular dough setting and you will end up with this beautiful ball of fluffy dough.


Dump the dough out onto a floured surface and divide into equal portions. The recipe is for 6, but I got 6 HUGE buns. Next time I would make at least 8, but probably 10.


Arrange buns on parchment paper lined cookie sheet, cover with towel, and allow to rise until doubled in size (about 20 minutes). Meanwhile, toast sesame seeds and prepare egg wash.

When doubled, brush with egg wash and sprinkle with toasted sesame seeds. I used 1/2 toasted and 1/2 raw.


Bake for 15-20 minutes. The recipe suggests rotating cookie sheets after 10 minutes, but I used my convection setting and it worked perfectly. My oven runs hot and these were perfect in 12 minutes. Enjoy!


Ingredients


1 cup water (warmed to 100 degrees)
2 1/4 tsp active dry yeast
2 tablespoon white sugar
1 cup buttermilk
1 1/2 teaspoons salt
5 cups bread flour (plus flour for shaping buns)
2 tablespoons butter
1 egg yolk
1 tablespoon water
*toasted sesame seeds as desired (optional)

Directions

1.Combine the warm water, yeast, and 2 tbsp sugar in breadmaker pan. Let stand about 10 minutes till very fizzy. Add buttermilk to yeast mixture. Add bread flour, salt and butter to breadpan. Set breadmaker to regular dough setting. When dough cycle is completed, remove from breadpan onto lightly floured surface. Divide dough into 12 equal portions. Make tight rounds of dough by pulling the dough tightly around and pinching it at the bottom. Place on two flat baking sheets lined with parchment paper or aluminum foil. After the rolls sit for a minute and relax, flatten each ball with the palm of your hand until it is 3 to 4 inches wide. You may want to oil your hand first.

2.Lay a clean dry dishtowel over rolls and set aside until doubled in size, about 20 minutes. Meanwhile preheat oven to 400 degrees.

3.Mix together the egg yolk and 1 tablespoon of water in a cup or small bowl. Brush the tops of the rolls with egg mixture and sprinkle with toasted sesame seeds.

4.Position 2 oven racks so they are not too close to the top or bottom of the oven (2nd and 4th rack in 5 rack oven). Bake for 10 minutes in the preheated oven. Remove the rolls from the oven and swap racks so each sheet spends a little time on the top. Continue to bake for another 5 to 10 minutes, or until nicely browned on the top and bottom.

September 20, 2010

Boiled Eggs

Ok, so I know what you're thinking...you know how to boil eggs. Who doesn't? But do you know how to perfectly boil eggs? I promise you'll get perfectly cooked hard-boiled eggs with fully-cooked, fluffy yolks that will never be green or gray. Here's how:

Place as many eggs as you want in a pot

Add enough cold water to cover the eggs completely

Bring to a boil; cook for 2 minutes

Cover & remove from heat

Let sit 10-11 minutes

Rinse with cold water (or cover with ice cubes) until cool enough to handle

Enjoy!

September 15, 2010

Guess what I got?

A bread machine! I've been baking homemade bread pretty much twice a day since I got it. Hubby and I have definitely been getting our daily recommended serving of carbs.

This is the first time in my life that I've consistently used recipes - I am sooooo not a recipe-follower lol - but since I'm not familiar with using a bread machine I've been forced to stick pretty close to the original recipe.

I've been using this recipe and changing it up just a little bit every day (or twice a day...sorry, skinny jeans) to perfect the base recipe to suit our taste. Well, I finally perfected it last night so today I felt adventurous enough to doctor up a bread machine recipe and it turned out so well!

Here's my version of "Inside-Out" Garlic Bread:

1 cup water (100-110°F)
2 Tbsp sugar
1 .25 oz package (2 1/4 tsp) active dry yeast
1/3 cup vegetable oil
3 cups white bread flour
1.5 tsp salt
3 Tbsp mixed Italian spices
1 Tbsp garlic powder (this might be too garlicky for some, so you can cut it in half)

Place the water, sugar, and yeast in the pan of the bread machine. Let the yeast dissolve and foam for 10 minutes.

Add the oil, flour and salt to the yeast. Select Basic or White Bread setting, and press Start. Check the dough after the first kneading cycle to ensure it is not too dry/wet and add water/flour (a tsp or so at a time) if needed.

That's it! :) Let it do it's magic and enjoy!

September 12, 2010

Maple "Scones"

I saw this recipe over at My Baking Addiction last night and made them this morning for my husband to take to work since my Yorkie decided to wake me up at 6.


Sorry for the crappy picture quality...my camera was dead and my iPhone hates me today.

I halved the recipe and had enough for my husband and I, plus a basket I sent to work with my hubby, plus 10 left over. They are very good. I made some maple butter to go with them and I find that took them from pretty darn good to amazing. Now, as Jamie notes, these are more biscuity than a traditional scone, but they're tasty so I don't think scone-lovers will mind too much.

I didn't bother rolling them out, I just used my hands to shape the dough into a big rectangle and cut it into squares.

Here is the recipe:

Maple Oatmeal Scones


Ingredients
For the Scones

3 1/2 cups all-purpose flour
1 cup whole-wheat flour
1 cup quick-cooking oats, plus additional for sprinkling
2 tablespoons baking powder
2 tablespoons granulated sugar
2 teaspoons salt
1 pound cold unsalted butter, diced
1/2 cup cold buttermilk
1/2 cup pure maple syrup
4 extra-large eggs, lightly beaten
1 egg beaten with 1 tablespoon milk or water, for egg wash


For the Glaze

1 1/4 cups confectioners’ sugar
1/2 cup pure maple syrup
1 teaspoon pure vanilla extract


Directions

Preheat the oven to 400 degrees F. In the bowl of an electric mixer fitted with a paddle attachment, combine the flours, oats, baking powder, sugar and salt. Blend the cold butter in at the lowest speed and mix until the butter is in pea-size pieces. Combine the buttermilk, maple syrup and eggs and add quickly to the flour-and-butter mixture. Mix until just blended. The dough may be sticky.

Dump the dough out onto a well-floured surface and be sure it is combined. Flour your hands and a rolling pin and roll the dough 3/4 to 1 inch thick. You should see lumps of butter in the dough. Cut into 3-inch rounds with a plain or fluted cutter and place on a baking sheet lined with parchment paper.

Brush the tops with egg wash. Bake for 20 to 25 minutes, until the tops are crisp and the insides are done.

To make the glaze, combine the confectioners’ sugar, maple syrup and vanilla. When the scones are done, cool for 5 minutes and drizzle each scone with 1 tablespoon of the glaze. I like to sprinkle some uncooked oats on the top, for garnish. The warmer the scones are when you glaze them, the thinner the glaze will be.


Maple Butter:

I don't measure when I make stuff like this, but I used around 1/8 c softened butter and mixed in about 1 Tbsp of good quality maple syrup. Basically just mix up a little syrup with butter until you get the flavour you like. Sooooooo good.

September 5, 2010

Homemade Pop-Tarts!!

Yep, you read right. Homemade Pop-Tarts! Holy YUM! These are so so so good. And so so so easy.


Who wouldn't want to give these to their family rather than the store-bought Pop-Tarts when they are so quick and easy to make? If you have pre-made pie crust (or store-bought) these take 15 minutes max to make including cook time.

I almost always use the original Crisco recipe for my pie crust since that is what my hubby's grandmother always used and he won't have it any other way.

You really don't need a recipe for these babies, but here's what I did:

Preheat your oven to whatever temperature is indicated for the crust. Usually around 425-450°F.

Roll out your dough and cut it into whatever shape you want just make sure they're pretty even and you have an even number of them. I did a few heart-shaped ones, but mostly just regular old rectangles.

Throw a few teaspoons of whatever filling you want in the center of one of your rectangles and top with a second; crimp the edges. I used 2 different kinds of jam, but you could use jam, pie filling, peanut butter, chocolate chips, etc - the possibilities are endless! I've got a container of Nutella that is just begging to be baked into Pop-Tarty goodness. You can add an egg wash if you want to, but I didn't bother.

Bake until golden brown...around 6-8 minutes.

Mix up a quick glaze of icing sugar and milk (and a drop of food coloring, of course) while they're baking.

Top with glaze & decorations while warm and enjoy! I promise you'll never buy Pop-Tarts again!

If you want to freeze these so you can toast them like store-bought Pop-Tarts, leave the glaze off and cool completely. Wrap with plastic wrap and freeze.